

Dankmeyer recently delivered an innovative shoulder disarticulation prosthesis using 3D printing to Mr. Berry Williams. A shoulder disarticulation is an amputation where the arm is removed from the shoulder joint, leaving the shoulder blade and collarbone intact. As in many amputations of this type, Mr. Williams’ amputation was a result of severe trauma in a motor vehicle accident. After his recovery from surgery, he was ready to get a prosthesis to help him resume the activities of daily living as well as complete routine tasks at his workplace.
A traditional design process for this device would include casting, creating a plastic molded socket, shaping and laminating a humeral section from the shoulder joint to the elbow (upper arm), cables and all the other elements required for this type of prosthesis. The final deliverable prosthesis would have taken much longer to fabricate and be heavier than an alternative solution involving 3D printing and a unique lightweight socket.
His clinician, Mary Reedy, CP, worked closely with our entire fabrication team to engage in some very clever in-house engineering to produce a prosthesis that weighs less, is more breathable than a traditional prosthesis and was fabricated and ready for the patient to take home in less time than traditional fabrication.
Mary started with a traditional casting with plaster and a mold of the patient’s shoulder was made. How did we get from this to 3D printing? Mary began by modifying and shaping the plaster model to adjust how the socket would interface with the patent’s shoulder and torso. Fabrication Technician Lukas Baner, CTPO, took over the creation of the test fit model. The mold was scanned and a 3D version of the patient’s anatomy and a test socket was created using specialized software.
Digital models of the shoulder joint were created and used to create 3D printed test components to attach to the shoulder joint and elbow joint of the prosthesis. This allows the joints to be better aligned in space relative to anatomical alignment and allows us to model and assemble a device virtually in the software – eliminating potential trial and error using physical materials. Parts to be 3D printed were selected and these test components were printed in house by our Digital Technician, Jay Hall, and assembled with the test socket, shoulder joint, elbow joint and harness for a test fit with Mr. Williams.
Working with his prosthetist Mary, they found other modifications to make, assuring the angles and length of cables to the terminal device Mr. Williams selected were correct. Once this process was complete, the test socket and components were scanned and compared to the previously established alignment. After Mr. Williams completed his test fitting, all necessary changes were completed, and a final socket shape was created. The mounting brackets for the shoulder and elbow were modeled in the appropriate alignment. It was time to fabricate the final product.


Before beginning final fabrication, our fabrication team had an idea that would elevate this design just in time for summer! Jeremy Halteman, CPO, Director of Technical Operations, worked with our CAD (Computer Assisted Design) software to implement a socket design for the prosthesis. Fabrication Technician Shawn Ross envisioned a design to create a lighter, more breathable socket. This socket design would be cooler and more flexible for everyday living, but particularly for Mr. Williams in his work.
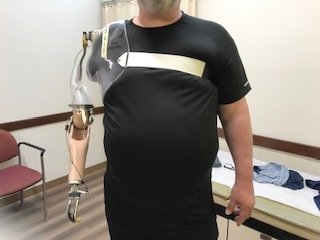
Shawn’s design modified the socket to have an open weave, lattice-like structure in the selected 3D printed material instead of the heavier solid plastic molded socket. The nylon components would be very strong, but lightweight and flexible. The finished design was sent off to be 3D printed using MJF PA12 Nylon material, and was received in about 4 days, ready to assemble with the other parts.
Mr. Williams came in and tried the revised design on and found it to be a good fit. He was ready to schedule sessions with Occupational Therapy for training using his new prosthesis. Further follow-ups with Mary Reedy will continue to allow for further refinements as Mr. Williams perfects his use of the prosthesis.
Our entire team is committed to constantly exploring innovative techniques to make improvements in the design and fit of all the prostheses and orthoses we fabricate. The success of Mr. Williams and of all our clients is our mission. We appreciate that Mr. Williams has allowed us to tell the story of his prosthesis’ fabrication and share photos of his original test fit design with the traditional socket, and the photo of him wearing the lattice socket he took home. These pictures clearly tell the story of what we call “the Dankmeyer Difference.”